Hey everyone!
I rarely do nail art. In fact, I haven’t done it in at least six months. But just this week, I decided to get a little creative and I’m so happy with the results! I had to share the change. Normally I like my manicures to be shiny, simple, and colorful. I’ve never done stamping, or ombre art. But nail art looks so good, and people definitely notice when you have it on. It’s also a conversation starter- it’s easier to say ‘cool nails!’ than ‘pretty color,’ you know?
There is one thing I need when it comes to the nail art I like, and that’s…
YELLOW POLISH!
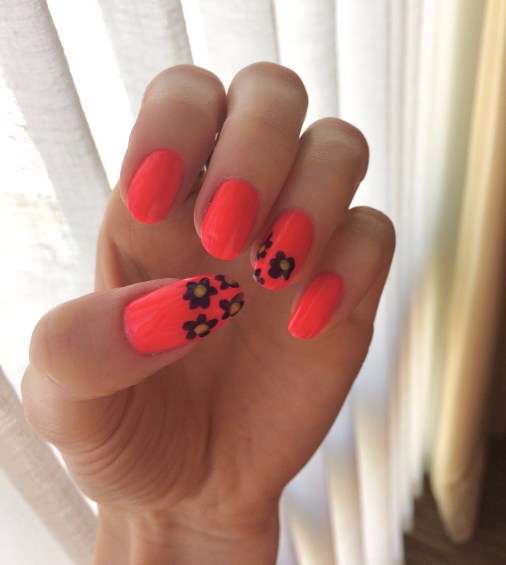
I finally picked up Mellow Yellow from the Sally Hansen Xtreme Wear line, and it’s perfect for nail art. It’s way too sheer for a mani (I tried it), but it looks great as the center of a flower. So here’s how to do quick and easy floral nail art that makes a big difference.

Okay, so now that you’ve seen how cute they look, here’s how I achieved that cute floral nail art!
✿ STEPS:
✿ Paint your nails with a bright color that will work as a base. I knew I had purple and yellow to work with, and figured they’d pop against a light red. This one is High Voltage by China Glaze, and it chipped within TWO HOURS!! Ugh. So pick something that will last on your nails.
✿ Let your base dry completely, and do not apply a top coat yet.
✿ Pick out a contrasting color (I used OPI’s I Carol About You, which is a deep purple). It’s very important that this is a color with a good formula and lots of saturation.
✿ Put the tiniest amount on the brush. Make sure there are no drops rolling down the top of the brush and no secret globs on the other side of the brush. Then dot on a small oval, and then dot next to that one and around it until you’ve made a tiny flower shape. It doesn’t need to be perfect because the center of the flower will really bring it together.
✿ After the flower shape has dried a bit, take your yellow and make sure a nice little bead of color has gathered on the end of the brush, but not too much. Just enough to transfer right onto the nail and leave a pop of color in one shot.
✿ Hit it with a good gel top coat that will last a few days. But FOR REAL- DO NOT RUSH DRY TIME. Let the nail art dry completely before applying your top coat.
I can’t tell you how many manicures I’ve ruined with smeary flower centers and messed up petals because I didn’t wait long enough before going in with my top-coat.
OPTIONAL:
Leave some fingers blank, and add little dots in another contrasting color. You can even try to paint on some green leaves (just do a more almond shaped oval dot, by dragging your brush a little bit with even less paint on the brush).
✿ Some great color combos:
-Pink nails with white flowers and yellow centers
-White nails with pink flowers and yellow or black centers

-Black nails with white flowers and yellow centers
-Mint and white
-Pale purple and dark purple

Black, white, or yellow centers are the best choice. Honestly, I’ve tried tons of colors and truly think yellow looks best!!

Getting back into nail art in this easy, casual way has definitely excited me and makes me want to try some harder stuff. Maybe I will pick up a little brush from Sally’s and will paint on some roses, or something. Or I could finally try stamping! There’s a big wide world of nail polish out there other than beautiful Orly creme neons (not that you’d know it from my blog! 😜) .
What do you think of these lil flowers? Do you ever do nail art?
-Taylor


i love your nail art!!
I love the white flowered nails!
http://www.styledbymckenz.com
Those are so cute! You did a great job 🙂 I wish I could paint designs on my nails as well as you can. Thanks for sharing!
Very cute 🙂
I love doing nail art and you did an amazing job. Can you please check out my blog http://www.chicstyledose.wordpress.com and if you like it do follow.