Hey everyone!
OMG. This is a huge, exciting post here on my blog. I bought top-rated fake nails on Amazon, bought the best glue at Sally’s, and conducted a serious experiment for you guys. I’ll answer all your questions, like:
Are fake nails worth the effort to do at home?
Do they damage your nails?
Is it hard to do them?
How long do they last?
Can I do anything while I have fake nails on?
And more! I had to do them twice for this experiment since I really messed up the first time (and I’ll show you the pics), and then wore them too long for a few days before finally filing them down to perfection.
First, here are the nails I bought on Amazon.
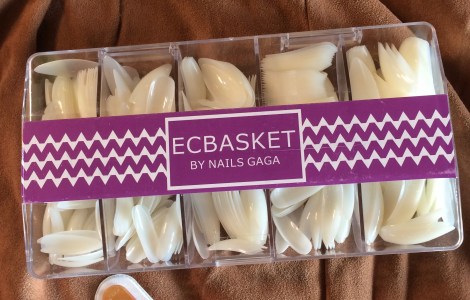
They were super affordable at $7 for a whole box. They arrived in exactly two days (thank you, Prime) and had mostly 5 star ratings and tons of photos accompanying reviews. I’m a total sucker for photo reviews. I love to see what I’m getting!

I went in knowing these nails were going to be ridiculously long, but figured I could file them down. But OH MAN were they crazy long when I put them on! They are in the stiletto shape, which is very trendy and definitely what I wanted. This means they are like an almond shaped nail that comes to a slight point. These particular nails have a nice curve to them, which makes them look natural even when they’re so long.

❀ ROUND ONE:
I glued my first set on with a very thin line of nail glue brushed on the back of the plastic nail. I wanted to see how long they would look on before really gluing them down. And as you can see below, they were REALLY long. They look good, but The Nanny theme song was playing in my head. These were just too long for me (and I’m from New Jersey so I can handle a long nail- I think the ladies of The Sopranos are style icons 😂).

So I popped those off and filed them down one by one. This is not a comfortable thing to do, btw. It’s hard to hold the nail and file it, and you have to keep checking that you’re doing an even job on each nail so the shape stays consistent. Filing plastic is difficult, but definitely doable with a strong grit file. I found my normal high grit files worked better than my glass ones.
Pre-filing below:

*DO NOT file them once they’re on, especially if you’re just practicing and only gluing them a little. This is too difficult with the nails on, and they will come right off which could damage the nail underneath.
Now that I had filed them all to a more reasonable size, I was ready to glue them back on. I was not going to glue them on all the way yet, since these are a big commitment- with a good nail glue, these nails could last for up to two weeks.

I applied the nails very carefully. If you’re not paying close attention to each nail, they can go on crooked. Then I painted them really quick with a favorite polish of mine. You can see how wonky my middle nail came out in the photo below.

I had applied each nail after painting one stripe of glue down the back of the nail and carefully pressing it on. This applied it well enough that I could paint them and yet still could take them off whenever I wanted easily enough. If you’re curious but only want to wear them for a weekend (or a few hours), that is the method of gluing I would recommend.

After a day, I popped those off and decided to really commit this time. I liked how the nails felt and thought they were good quality. Time to really start the fake nails experiment!
❀ ROUND TWO:
I filed a set of ten nails down further while checking periodically that they’d look right on my nails all together. I didn’t want some nails shorter or sharper than others. I had to file the pinky nail down on the sides so it was actually small enough to fit on my nail properly.
I applied nail strengthener, then dried and cleaned my nails for the glue. Then I brushed on the glue on the back of each nail in quick strokes and applied it carefully. I did not apply the nail glue to my own nail.

The filed nails were more rounded than when out of the box, since I lost some of that stiletto almond look while filing. That’s definitely a con of this particular box of nails- they are too long, and filing them into the original stiletto takes a lot of work. BUT I do have good news about that.

I added gemstones because I was working with so much nail space. I regretted this instantly and my boyfriend found the gems tacky (wah wah). I used nail glue to adhere them to the nail, so I couldn’t just get them off with acetone.

I managed to get the yellow ones off with a bit of acetone and a wooden nail stick, but I painted over the silver ones after a few days.
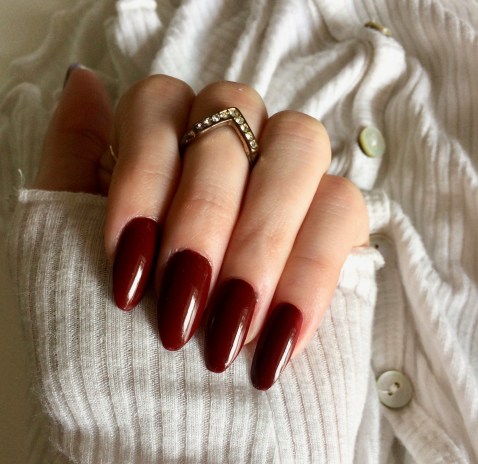
❀ FINAL PRODUCT:
After a day of those long-ass nails completely inhibiting my life, I filed them down to a reasonable length.

Once the glue had totally dried and they were one with my natural nail underneath, I found filing them to be much easier! So big points for that!! I could even file them into the original stiletto shape, which was AWESOME!

They looked SO good and I could even type and stuff with them at this more reasonable length. I found a manicure of one color looked better than an accent nail, which I’d experimented with. First I had the gemstones, then I did a natural colored accent nail with oxblood flowers. But the manicure above is what looked most polished and professional to me (not professional like corporate, but professional like I had them done in a salon.)
I felt fancy and pretty with these nails on, and I found myself tapping them on the table and looking at them all the time. I sent photos of them to everybody (and got various responses from ‘beautiful!’ to ‘you could claw somebody’s eyes out with those!’ 😂).
❀ MY FINAL REVIEW:
Once painted and filed the way I liked, I loved these nails. They looked great, felt sturdy, and didn’t come off until I was ready to take them off. I thought they looked salon done, and the shape was so trendy. I would definitely do this again AND recommend them to someone else (although probably not a total nail newbie!)
Here are the answers to all the fake nail questions!
Are fake nails worth the effort to do at home?
Yes! Once you get the hang of it, fake nails at home are a fun and easy addition to a beauty routine. It’s really not much harder or laborious than a regular manicure.
Do they damage your nails?
No, not really! When I took my final set off after four days of wear, my nails still looked as healthy and long as when I applied the nails. I think this is because I’d applied two coats of nail strengthener underneath the nail glue. There is texture on my nails from the glue that didn’t come off with acetone, but I don’t detect any other damage. On one nail, the glue peeled off a slight top layer of my nail, but I added more nail strengthener and nail oil, and it’s already bouncing back.
Is it hard to do them?
At first, applying them with the flair and precision of your local nail tech is very difficult. As you saw, mine came out crooked at first and I was really glad I was only practicing. Applying them to your dominant hand with fake nails is definitely the hardest part, but even that will go well with time and patience!
Can I polish them like normal nails?
Yes! I even took acetone to them and took the polish off, and reapplied different polish. You can’t do this a lot or the acetone will wear down the plastic of the nail, but once or twice is okay. So yes, you can paint these nails the same as your own! They just take a lot more polish than natural nails (more surface area) and good nail painting technique is still a must. I flooded the cuticle the first time I painted them, and it was not easy to clean that up in between the ridge of the fake nail and my cuticle. So take care to paint well!
Can I do anything while I have fake nails on?
The real answer is… No! Haha. Just kidding. You can still do almost everything. You can text on an iPhone easily, and I could still cook, shower, do the dishes, read, all that normal stuff. Typing on my computer was harder, so if you have a typing intensive job, try shorter nails. Those stiletto bad boys really got in the way of my keyboard. Putting in my earplugs was harder before bed, and finicky touch screens are annoying with nails. But you get used to it all the longer you have them on.
How long do they last?
Mine lasted for four days, but I could have definitely worn them longer. I didn’t take care to keep them dry in the shower and used them to gently scratch my scalp while shampooing (it felt like a scalp massage 🤤) which loosened the glue. I only wore rubber gloves for dishes some of the time. If I’d been disciplined about all that and didn’t pick at them, I have no doubt they could stay on for a week or more. But on the bright side, they came off easily and without pain!
❀❀❀
If you have ANY questions about fake nails, please leave me a comment or hit me up on my nails instagram! I’m at @taylordorothynails and my fake nails post is about to go up over there, too. As a nail blogger, I’m happy to be guinea pig so you don’t have to be.
Have you ever done fake nails at home? Do you ever go to the salon and get acrylics? One way is certainly cheaper…! 😜 What did you think of these?
-Taylor


Great post! I tried DIY acrylic nails last year. I really liked how they looked. Here’s a post I did on them. I thought they turned out good for doing it for the first time. https://cornfedcontessa.com/2016/05/30/diy-acrylic-nails/
Wow, what an insightful and detailed post! 🌟 I’ve always struggled with finding the right products for my skincare routine, but your recommendations have given me a lot of new options to consider. Especially the way you broke down the benefits of different ingredients was incredibly helpful. I can’t wait to try out some of these tips myself. Thank you for sharing such valuable information! Keep up the great work! 😊
https://exsivia.com/how-to-get-nail-glue-off-skin-during-nail-prep/
Great insights! This article provides valuable information on an important medical topic. It’s always helpful to stay informed about the latest research and best practices for maintaining good health. Thanks for sharing!